After completing the QSD/QSE module in
part 4 I began working on the much needed filter module. Since I wanted my transceiver to cover more or less DC to 30MHz I needed quite a few band pass filters that could be switched in and out depending on the active operating frequency. I also wanted a modular design so that I could experiment with different filters without having to de-solder anything. To do this a decided to create a base module containing all the logic and switching circuitry and have all the filters as individual plugins. It would also be extra nice if all of this could fit inside the same RF-box dimensions as the QSD/QSE module. That way I could easily stack the modules in the final assembly. It also means at lot of filters in a small area. Hopefully I don't mess this up completely...
After seeing how well the FST3253 performed in the QSD/QSE module I was curious to see how it would perform when using it as an RF switch for selecting the filters. The more common approach to this is to use relays or PIN diodes but there was no way I would be able to fit relays into such a tiny module and PIN diodes don't work very well at low frequencies (<1MHz), so the FST3253 suddenly became a very interesting option.
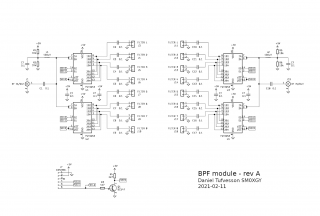
This is the design I ended up with. In the middle are connectors for a total of eight filter plugins. I used four FST3253 switches. Two on each side of the filters. In theory I could probably make do with one on each side but doing it like this made the layout better and paralleling the switch banks in each FST3253 lowers the on-resistance. The control input to the module (SEL0-SEL2) is a 3-bit binary value (0-7) selecting one of the eight filters at a time.
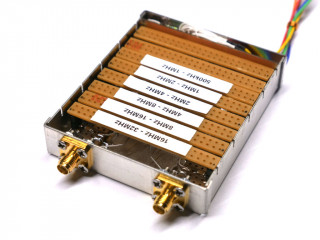
The external interface of the filter module follows the same design as the QSD/QSE module with two SMA connectors for the RF ports on one side and the power supply and control signals on the other. Opening the lid of the module reveals the filter plugins on top of the base board. A lot of things in a small space. Surface mounted components was more or less the only option.
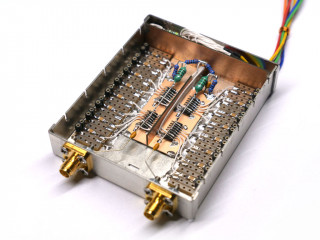
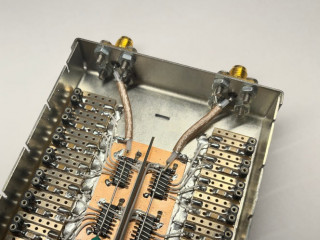
Removing the filter plugins shows the innards of the module. Here the layout mostly follows the layout of the schematic. I used strip board for alignment of the filter plugin sockets and plain copper board for the switches.
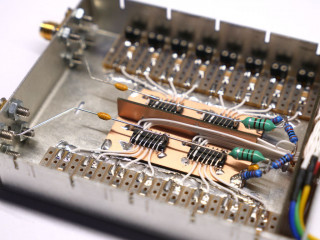
Some extra isolation between the two sides. Don't know how much it actually helps but it can't hurt and keeps the cabling tidy. The control wires are super-glued to the center board to keep them in place.
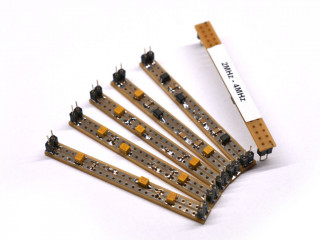
To get started I assembled a set of filter modules. They need some more work but performs well enough for testing. I probably should use double sided boards with more grounding to improve stop band performance.
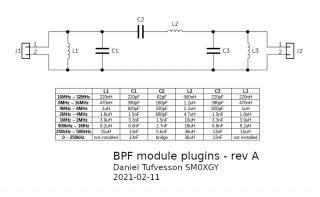
The filters right now are simple three pole designs using components I had available but there is room on the plugin boards for five poles and I definitely would like to improve these. The filters are not divided into HAM bands but in general segments without gaps. I like that design since it really makes it general coverage and still keeps the cross-over points out of the HAM bands. Eight filters covers the range up to 30MHz nicely but below 250kHz there may be need of some external filtering or at least a tuned antenna.
Conclusion
This was a very welcome addition to my transceiver project. Integrating the filter selection with the VFO was trivial and suddenly made it a very fun and useful radio (more on this in an upcoming post). I made a few quick VNA measurements (miniVNA Tiny) and was surprised to see that this module performs similar to other pre-fabricated modules I have so I definitely will keep it like this and move on with the rest of the build.
Update 2023-01-06
I just could not give the two flying input and output capacitors a pass. It was a quick and dirty design and now I had a few minutes over to correct this. I replaced them with two short lengths of RG-316 and two small SMD capacitors. This improved the extended stop band performance quite a bit!